EZ Slice, a quick way to get pizza in your mouth


Have you ever been laying in bed, half asleep, stomach rumbling, and then you realize: "I want food, but im too lazy to get it"
Well I have, and it inspired me to come up with the next generation of voice recognition technology, EZ Slice

What is EZ Slice?
EZ Slice is a very easy to make hack for Alexa, where we no longer have to make coherrent sounds to get what we want!
Your own custom sighs, moans, or any other sound, can be used to trigger any Alexa command. We are going to build an Alexa app that makes it easy to get pizza to show up to your front door.

At the end of the day, saying making/ordering food is just too much work! It would be much more efficient to just say "Argh", and it knows exactly what to do.
Setup
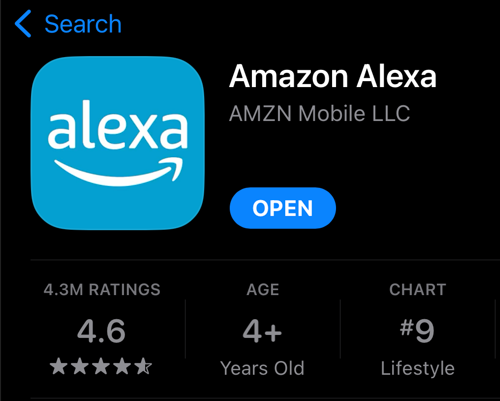
First, make sure you download the "Alexa" app from the store on your mobile device:
Go into the app and configure it to be synced with your Alexa.
Customizing your Wake word
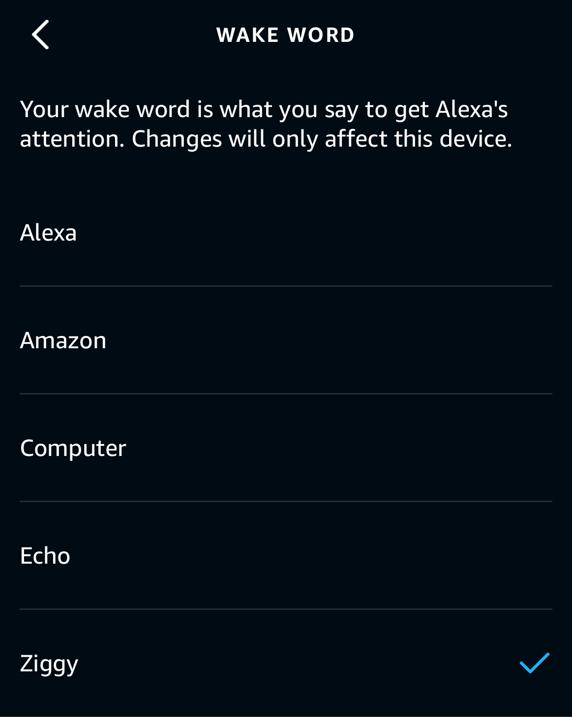
There are a few different "Wake" words for Alexa. By default, it is "Alexa", but the open vowel sounds required to say the letter "A" take too much energy!
For this reason, were going to change the trigger word to be "Ziggy" which is much easier to say when you're tired.
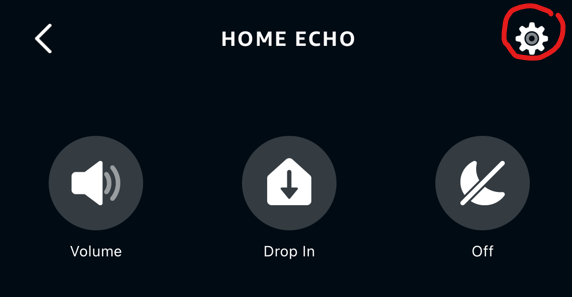
To do this, find your Alexa in the "Devices" section
Once you've found it, you will want to go into its settings:
And in here, we can change the Wake word:
Building the App
Now that we have changed our wake word, we can move on to making EZ Slice!
First, we must make a Amazon Developer Account.
This will give you access to a lot of tools, but we will be making a app with the Alexa Skills Kit
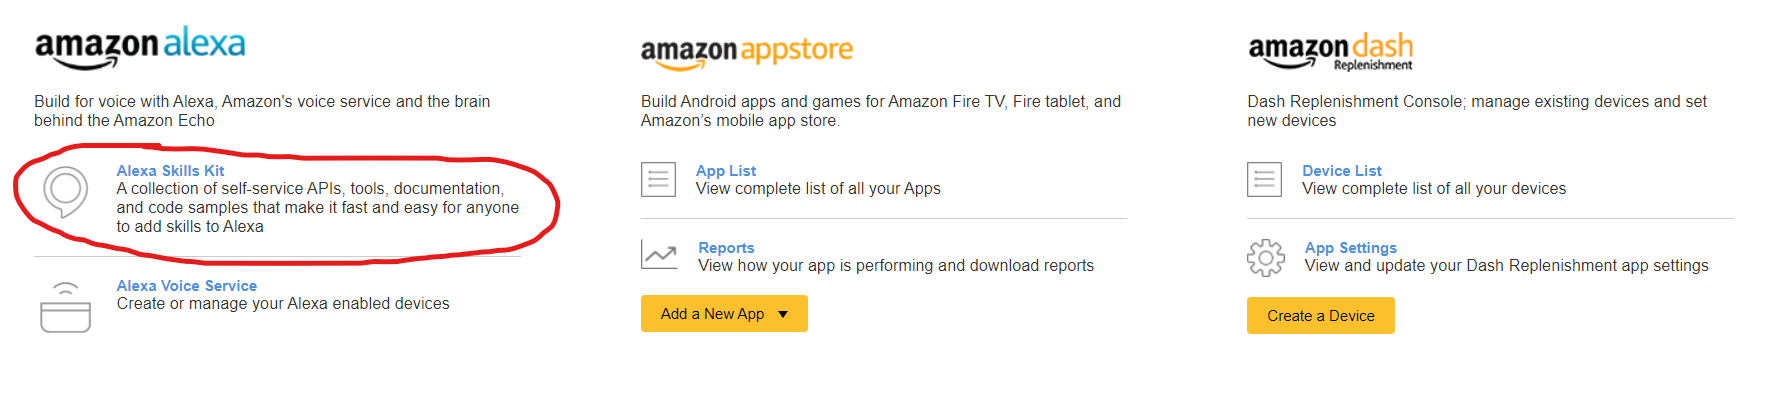
Once you are done setting up your account, access the Alexa Skills Kit, where we will begin creating our App!
You will have to click Create Skill, where you will proceed to configure it's settings before continuing.
For context, this is how I set up mine:
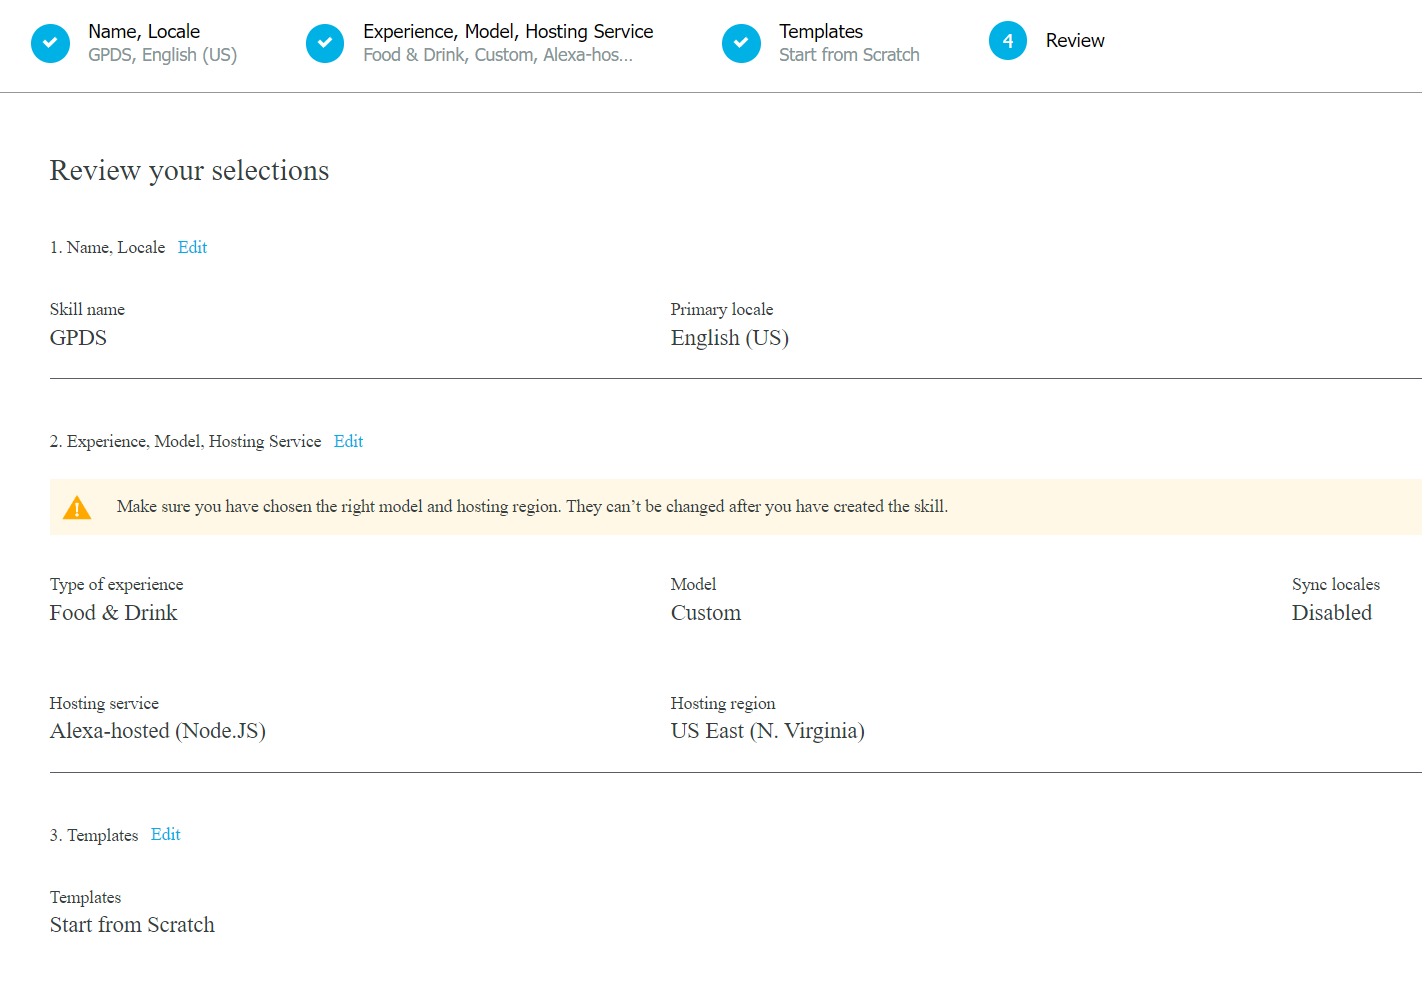
I named my app GPDS (Grunting Pizza Delivery Service) and am building it from scratch using Node.JS
Internal Configuration
Once we have created our skill, we want to start by naming our Skill Invocation What we name the skill will be our Trigger word to run our app, so make it something easy to mumble.
For example, in our situation, if we set the Skill Invocation to "Do it", I can just mumble "Ziggy, do it", and the pizza should be ordered to my house.
Connecting to AWS Lambda
AWS Lambda is where we will be implementing the majority of this project, you can access it via the AWS Console, and searching for it in the search bar.
We will be using 3 AWS Services to build this app:
- Lambda (To write our code)
- Secrets Manager (To store our credit card and location info)
- Cloudwatch (To read error logs and debug)
We will also be integrating with the Dominos Pizza Delivery System. This can be done through their unofficial API, which can be found here
Secrets Configuration
Let's start by creating our secret, which will safely store our credit card information and location, so that our app can properly place orders to our home.
We will do this by creating a new secret in the AWS Secrets Manager. We only need to set the Secret Type to "Other type of secret", and then plug in the Key/Pair values. Everything else can be ignored.
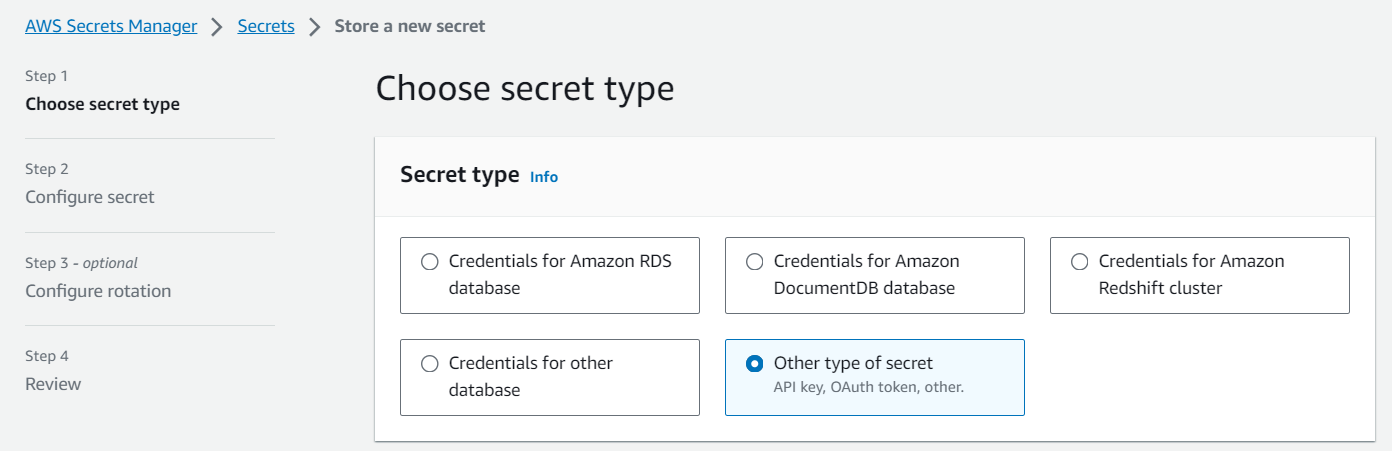
We also want to name our Secret so we have a means of accessing it in our Lambda function. I named mine dominosOrdering.
Setting up Permissions in our Lambda Function
Once we are done creating our secret, we want to go to AWS Lambda to create a new function.
Create a new function using Node.JS, and leave all the other settings default.
Before writing any code, lets get all configuration out of the way. Firstly, we want to add Alexa as a trigger for our Lambda function:

When doing this, we are going to tie this function to our Skill that we created earlier.
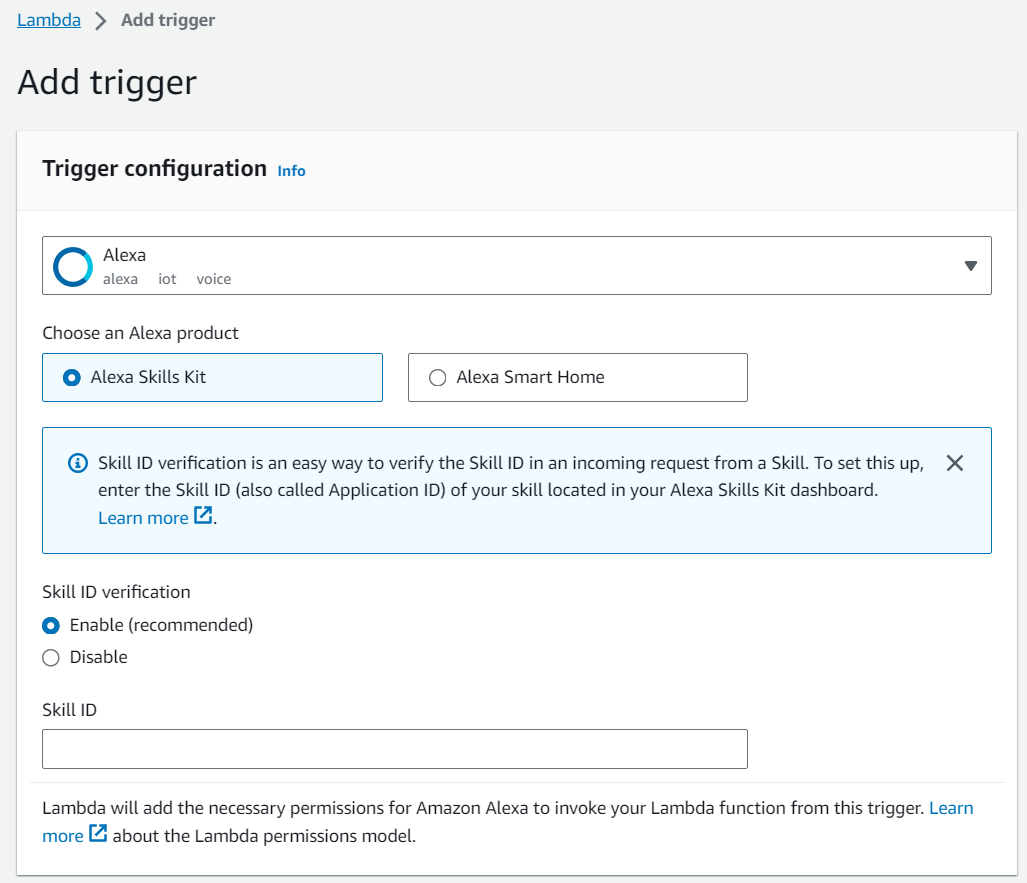
To do this, we have to find our Skill ID, and input it here. We can find our Skill ID back in our Alexa Skill Dashboard, in the "Endpoint" tab:

On this same page, we also want to input our Lambda functions ARN into each region to fully link the Skill with our Function:
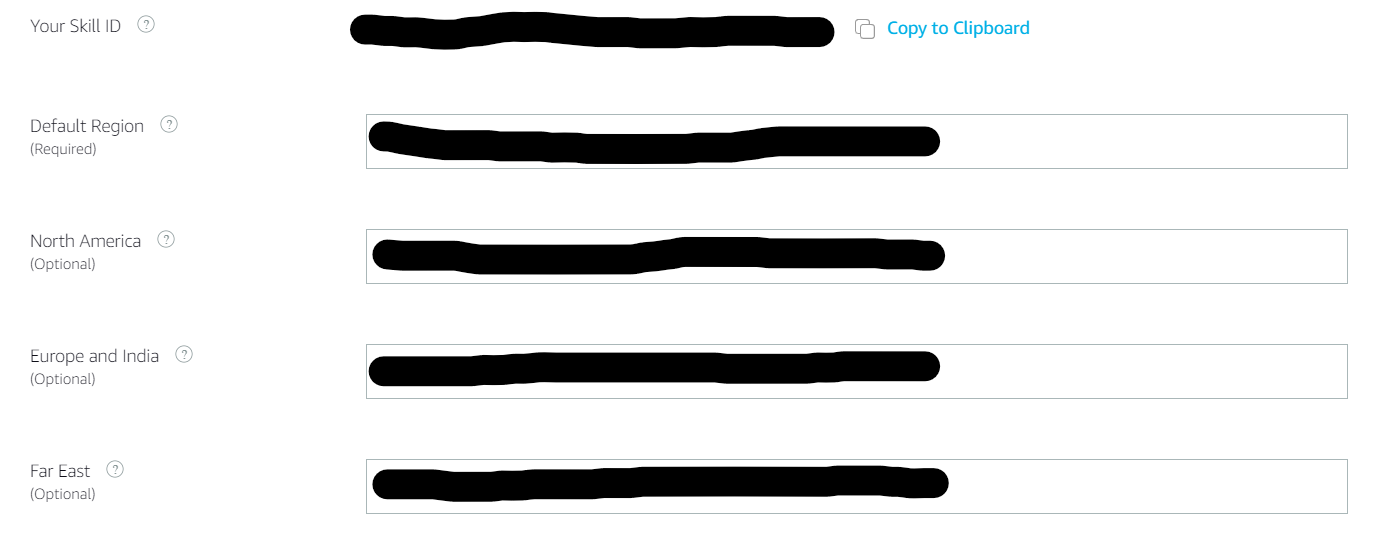
We can copy our ARN at the top right of our Lambda function page:

Now, all we need to do is give our Lambda function access to the Secrets Manager.
To give our function access to the secrets we created, we need to go to Configuration >> Permissions and click on our role name:

This will take us where we can attach a policy to give our function the proper IAM permissions:
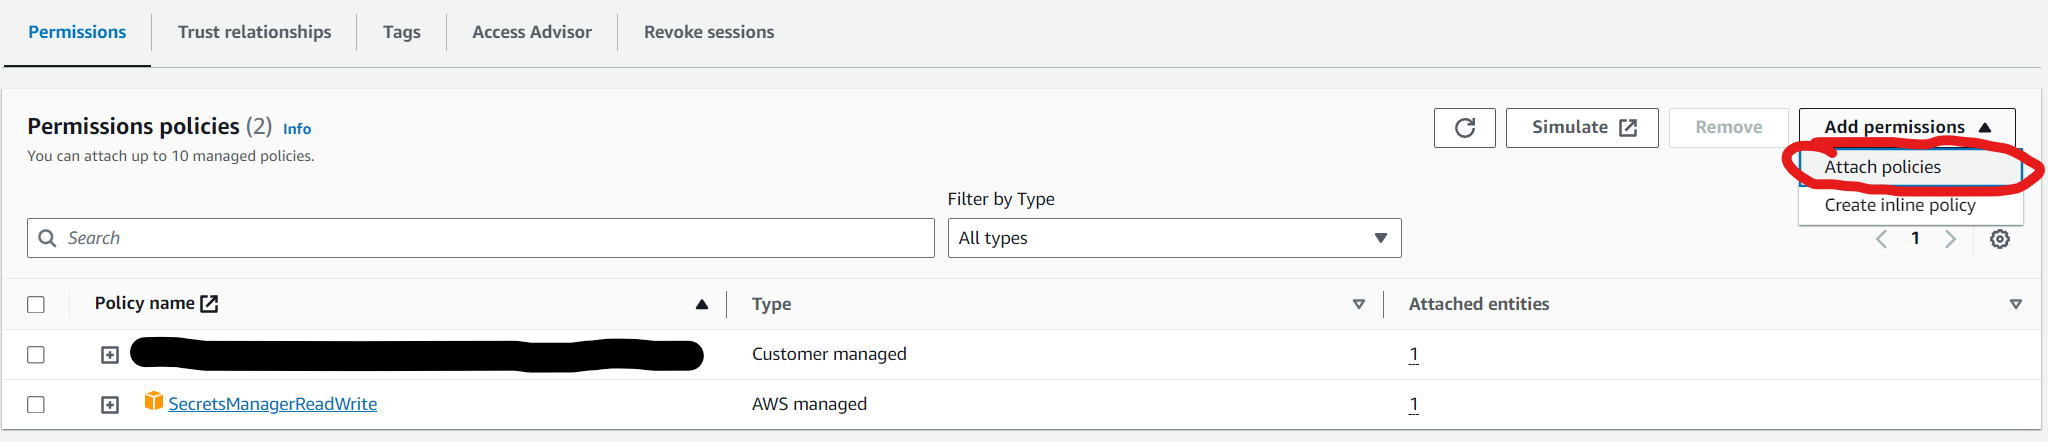
Just search for the SecretsManagerReadWrite policy, and add it to your roles. And voila! Permissions are set up.
Adding environment variables to our function
The last thing we want to do before we write any code is configure our environment variable called DRY_MODE, which will allow us to test our function without accidently ordering pizza.
We can do this by navigating to Configuration >> Environment Variables:

Code
Now that all of our configuration is out of the way, we can finally begin implementing our project!
Code for the project can be found here
You can clone the repo, or download it as a zip. After either cloning the repo, or downloading the zip and unzipping it, you'll want to build your node_modules folder by running the following command in the directory of your project:
npm install
We have 3 dependencies for our project, 2 of which are needed to properly use AWS services and Alexa:
"dependencies": {
    "ask-sdk-core": "^2.14.0",
    "aws-sdk": "^2.1464.0",
    "dominos": "^3.3.1"
  }
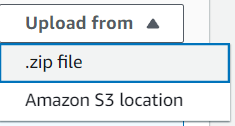
To upload the code into your Lambda function, simply upload a zipped version of the project in the Code tab in AWS Lambda:
To zip your project, you can simply run this command in your projects directory:
zip -r your_file_name.zip .
You can then simply upload the generated zip file to AWS Lambda
Code Review
All of the functional code of the project is written inside of index.mjs
Lets break down this file down and understand what it's doing.
Firstly, we want to import the necessary tools from Amazon and the Dominos API to make this work:
import Alexa from 'ask-sdk-core';
import { Order, Customer, Item, Payment, NearbyStores, Tracking, Menu } from 'dominos';
import AWS from 'aws-sdk';
We then want to initialize our Secret Manager:
// Create a Secrets Manager client
const secretsManager = new AWS.SecretsManager();

async function getSecret(secretName) {
    return new Promise((resolve, reject) => {
        secretsManager.getSecretValue({ SecretId: secretName }, (err, data) => {
            if (err) {
                reject(err);
            } else {
                // Secrets are returned as a stringified JSON. Parse them.
                resolve(JSON.parse(data.SecretString));
            }
        });
    });
}
We also want to initialize the functions to both find the closest Dominos store to us, and make an order:
async function findNearestStore(address) {
    const nearbyStores = await new NearbyStores(address);
    let storeID = 0;
    let distance = 100;

    for (const store of nearbyStores.stores) {
        if (store.IsOnlineCapable
            && store.IsDeliveryStore
            && store.IsOpen
            && store.ServiceIsOpen.Delivery
            && store.MinDistance < distance) {
            distance = store.MinDistance;
            storeID = store.StoreID;
        }
    }

    if (storeID == 0) {
        throw ReferenceError('No Open Stores');
    }
    return storeID;
}

async function createOrder(customer, pizza, storeID) {
    const order = new Order(customer);
    order.storeID = storeID;
    order.addItem(pizza);
    await order.validate();
    await order.price();
    return order;
}
And lastly, we want to initialize our LaunchRequestHandler, which for all purposes, functions as a main function:
const LaunchRequestHandler = {
async canHandle(handlerInput) {
return Alexa.getRequestType(handlerInput.requestEnvelope) === 'LaunchRequest';
},
async handle(handlerInput) {
const dryMode = process.env.DRY_MODE !== 'false';
try {
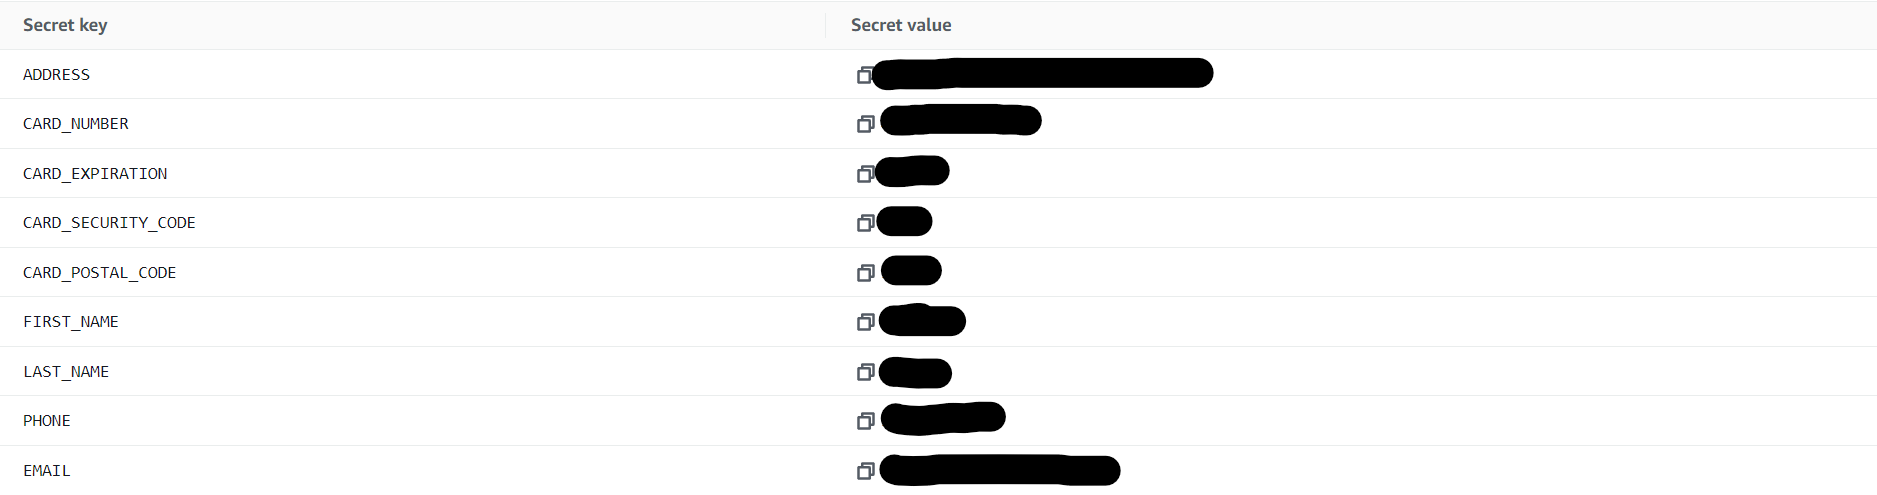
const secrets = await getSecret('dominosOrdering');
const address = secrets.ADDRESS;
const cardDetails = {
number: secrets.CARD_NUMBER,
expiration: secrets.CARD_EXPIRATION,
securityCode: secrets.CARD_SECURITY_CODE,
postalCode: secrets.CARD_POSTAL_CODE
};
//Cheese Pizza
const pizza=new Item(
{
code:'14SCREEN'
}
);
const customer = new Customer({
address: address,
firstName: secrets.FIRST_NAME,
lastName: secrets.LAST_NAME,
phone: secrets.PHONE,
email: secrets.EMAIL
});
const storeID = await findNearestStore(address);
// Get the menu for the found store
const menu = await new Menu(storeID);
const order = await createOrder(customer, pizza, storeID);
const myCard = new Payment({
amount: order.amountsBreakdown.customer,
...cardDetails,
tipAmount: 1
});
order.payments.push(myCard);
if (dryMode) {
console.log("DRY MODE: The order would have been placed now.");
return handlerInput.responseBuilder
.speak('This is a dry run. Your pizza order would have been placed.')
.getResponse();
} else {
await order.place();
const tracking = new Tracking();
const trackingResult = await tracking.byPhone(customer.phone);
console.log("Order placed successfully. Tracking result:", trackingResult);
return handlerInput.responseBuilder
.speak('Your pizza order has been placed and is on its way!')
.getResponse();
}
} catch (error) {
console.error("Error while placing order:", error);
if (error instanceof ReferenceError && error.message === 'No Open Stores') {
return handlerInput.responseBuilder
.speak('Sorry, there are no open stores near you at the moment. Please try again later.')
.getResponse();
} else {
return handlerInput.responseBuilder
.speak('Sorry, there was an issue placing your order. Please try again later.')
.getResponse();
}
}
}
};
Let's break this down.
Firstly, we want to fetch our Dry Mode environmental variable:
const dryMode = process.env.DRY_MODE !== 'false';
We then want to initialize and fetch our payment secrets from our secret manager:
const secrets = await getSecret('dominosOrdering');
  const address = secrets.ADDRESS;
  const cardDetails = {
    number: secrets.CARD_NUMBER,
    expiration: secrets.CARD_EXPIRATION,
    securityCode: secrets.CARD_SECURITY_CODE,
    postalCode: secrets.CARD_POSTAL_CODE
  };
Then, we can hard-code what we want to order, to avoid having to specify when we invocate the skill:
//Cheese Pizza
const pizza=new Item(
  {
    code:'14SCREEN'
  }
);
In this example, we just order a regular 14 inch cheese pizza
The Unofficial Dominos API Documentation contains information on product codes, how to use their API, and a lot of other useful information.
Next, we want to fetch our personal info, and initialize ourselves as a customer:
 const customer = new Customer({
                address: address,
                firstName: secrets.FIRST_NAME,
                lastName: secrets.LAST_NAME,
                phone: secrets.PHONE,
                email: secrets.EMAIL
            });
We can then run our functions to find the store nearest to us, create our order for said location, initialize our card information, and push it to the payment system:
const storeID = await findNearestStore(address);

const order = await createOrder(customer, pizza, storeID);

const myCard = new Payment({
      amount: order.amountsBreakdown.customer,
      ...cardDetails,
      tipAmount: 4
});

order.payments.push(myCard);
At the end, we check if we are in Dry Mode or not, to decide whether the order should go through:
if (dryMode) {
                console.log("DRY MODE: The order would have been placed now.");
                return handlerInput.responseBuilder
                    .speak('This is a dry run. Your pizza order would have been placed.')
                    .getResponse();
            } else {
                await order.place();

                const tracking = new Tracking();
                const trackingResult = await tracking.byPhone(customer.phone);
                console.log("Order placed successfully. Tracking result:", trackingResult);

                return handlerInput.responseBuilder
                    .speak('Your pizza order has been placed and is on its way!')
                    .getResponse();
            }
The rest of the code is error catching, and a statement to properly export the code:
catch (error) {
            console.error("Error while placing order:", error);

            if (error instanceof ReferenceError && error.message === 'No Open Stores') {
                return handlerInput.responseBuilder
                    .speak('Sorry, there are no open stores near you at the moment. Please try again later.')
                    .getResponse();
            } else {
                return handlerInput.responseBuilder
                    .speak('Sorry, there was an issue placing your order. Please try again later.')
                    .getResponse();
            }
        }
export const handler = Alexa.SkillBuilders.custom()
    .addRequestHandlers(LaunchRequestHandler)
    .lambda();
And with that, everything should be properly configured! Make sure you Build your skill in the Amazon Developer Console, upload your zip file, and set your skill to Developer mode.
As long as your Alexa Device is under the same account as your developer account, you are ready to order pizza! You can test it in dry mode before making the actual order, and can do any necessary debugging via AWS Cloudwatch.
Results
Code for this project can be found here!
Do you like unhinged content? Follow me on X! Or Buy me a coffee!